Inventory
The Inventory page displays your organization's physical and digital records. For example, you may see digital copies of physical records stored with Access, or simply digital records.
 This Knowledge Base topic includes the following sections:
-
On the left side of the Inventory page you can specify to display the inventory by Box, Folder, and other record types. The record type displays above the grid and the grid will display columns specific to the record type. For example, if you select Box, Box displays above the grid and the grid displays columns specific to boxes.
-
To view the details of a record click the record or click Actions menu to the right of the record and select View. The record's details panel displays. The panel information is displayed in specific sections that differ based on the record. You can expand and collapse the sections. And if you expand or collapse a section, that section will continue to be expanded or collapsed until you make a change. You can also re-size the record details panel. And if you click another record in the Inventory page grid, the panel will remain open and display the details for that record.
-
You can re-size the Inventory panel to control how much of the Inventory page grid displays.
-
You can move a column in the inventory grid by dragging and dropping the column heading. If you select another record type on the right, you can save the column settings.
-
You can Lock and Unlock columns in the grid.
-
You can Hide and Show Columns in the grid.
-
You can click a column heading in the grid to sort a column in ascending or descending order.
-
You can click and drag to the right of a column heading make a column wider or narrower.
-
Any modifications you make to a grid are unique to your view of the grid and are not shared with other users.
-
The actions you can perform on records, like editing a record, are determined by your user role permissions.
-
The Image Downloaded column indicates if a user has downloaded images of a record.
Global Search is a powerful and intuitive tool that lets you search across all your inventory collections, records, and orders from a single search bar. By entering keywords or tags, you can quickly find the records you need. And you don't need to specify a metadata column, which provides more flexibility and ease of use.
-
On the Inventory page, in the Search field enter a single search term or tag, and then press Enter or click the Search button. A search term can be up to 15 characters long.
-
You can also search by multiple search terms. Enter up to five search terms for records. Each search term can be up to 15 characters long. After entering a search term, enter a comma, and then press Enter or click the Search button.
-
Click a search result to display the details page. Or on the Actions menu on the far right, click View.
-
To submit a request for Access to scan a physical record, on the Actions menu on the far right, select Image.
-
To submit a request for Access to scan a group of physical records, select the records and on the Bulk Action menu on the bottom left, select Image.
-
To edit a record, on the Actions menu on the far right, click Edit Record.
-
To add an attachment, on the Actions menu on the far right, click Upload.
Search Tips
-
Enter complete search terms. Don't enter partial or plural or other variations. For example to find an employee file for Robert Jones, enter robert or jones. If you only enter rob or jone, Search Results won't display the correct results.
-
You can search by numbers and dates. For example, you can search by Employee ID number. Dates have to be in this format MM/DD/YYYY. For example, 12/31/2012.
-
Access Unify doesn't support wildcard searches. Access Unify also will not search for these terms: a, an, and, are, as, at, be, but, by, for, if, in, into, is, it, no, not, of, on, or, such, that, the, their, then, there, these, they, this, to, was, will, or with.
-
You can enter search terms with or without capitalization. For example, you can search for Jones or jones. The search results will be the same.
-
If a record is edited, it can take up to 12 hours for Search Results to display the updated information.
-
Access Unify searches all record types, not just the current record type page. For example, if you are on the Box page and enter the search term jones, Search Results will display an employee file for Robert Jones and Patricia Jones.
The table below describes the navigation features that help you navigate the inventory grid.
|
Feature |
Description |
|
|
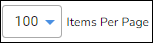
The maximum number of records that display per page. You can select a new value from the items per page list and each page of records displays this maximum number of assets. |
|
|
Click the Go to the first page button to go to the first page of results. |
|
|
Click the Go to the previous page button to go to the previous page of results. |
|
|
Click the Go to the next page button to go to the next page of results. |
|
|
Click the Go to the last page button to go to the last page of results. |
|
|
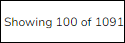
Displays a count of the number of items on the current page and the total number of items. |


In the Inventory page grid, you can filter columns in the grid. Filtering supports several operators that help you find the records you want. And saving a filter lets you re-use your search criteria.


To filter the grid, either click beneath the heading of the column to filter. Then you can specify an operator and a filter value.
Or click the Global Filter  button. Then you can specify a column to filter, an operator, and a filter value.
Alphanumeric operators
| Operator | Description |
| Equals | Ensures the items in the column match the specified criteria precisely, without any variations or partial matches. For example, in Invoice Number if you enter 12345, the column will only display an invoice with the number 12345. |
| Contains | Ensures that the items in the column include a specific sequence of characters. For example, in Invoice Number, if you enter 234, the column will display an invoice with these numbers: 12345 and 23456. |
| Is Blank | Ensures the value of items in the column is not populated. |
| Is Not Blank | Ensures the value of items in the column is populated. |
| Is Any | Ensures the items in the column match any criteria, separated by commas. For example, in Invoice Number, if you enter 234, 891, the column will display invoices with these numbers: 12345, 23456, and 78910. |
Date operators
| Operator | Description |
| Equals | Ensures items in the column match the specified date precisely. For example, in Service Date, if you enter or select 02/02/2020 (February 2, 2020), the column will only display service repairs for 02/02/2020. |
| Before | Ensures items in the column are before the specified date. For example, in Service Date, if you enter or select 02/02/2020 (February 2, 2020), the column will display any service repairs before 02/02/2020. |
| After | Ensures items in the column are after the specified date. For example, in Service Date, if you enter or select 02/02/2020 (February 2, 2020), the column will display any service repairs after 02/02/2020. |
| Between |
Ensures items in the column are within the specified date range. There are two ways to specify a date range:
|
NOTE: If you manually enter dates, the dates must be in this format: MM/DD/YYYY.
Other operators
| Operator | Description |
| True | Ensures the value of items in the column is populated. For example, in Attachments, if you select True, the column will only display items with attachments. |
| False | Ensures the value of items in the column is not populated. For example, in Attachments, if you select False, the column will only display items without attachments. |
You can specify multiple filter operators, and the Inventory page displays the operators you’ve applied.

Saved filters
-
Click
 to save a filter to find the same records in the future. You can specify if the filter is Private and for your use only or if the filter is Public and can be used by users with access to the same Access Unify environment.
-
Click
 to view your saved private filters and your organization’s saved public filters. Click to
  apply a filter. Click
  to edit your filter. Or click to save a duplicate of a filter.
 -
Other users can view and run a public filter, but can only access records they have permission to access. For example, if you create a public filter for accounting records, a user with only access to HR records will be able to view and your public filter but will not be able to view the accounting records.
-
If the Type column does not display, click the Actions button in the column heading, click Show Columns, and select the Type field column.
-
Records with a paperclip icon in the Attachment column are digitized physical records, digital records, or contain attachments. Click the record. Or click the Actions menu to the right of the folder, and then select View. The details page displays.
-
Click the record or click the Actions menu to the right of the record and select View. The record displays in the Document Viewer.
-
If the Type column does not display, click the Actions button in the column heading, click Show Columns, and select the Type field colum
-
Records with a paperclip icon in the Attachment column are digitized physical records, digital records, or contain attachments. Select the record(s) in the grid.
-
Click
 .
. -
Select Download All or Download Selected. Access Unify downloads up to 20 images to the download folder for your Internet browser.
-
For more than 20 images, Access Unify displays a message that you will receive a notification when a ZIP file of the images is ready to download from your Download Inbox.
-
Enter a tag name for your request. A tag makes your request easier to identify in your Download Inbox.
-
Click OK.
-
Check your email. A notification will display when a ZIP file of the images is ready to download from your Download Inbox.
If your Access Unify subscription includes the Orders feature, you can place an order for Access to scan and digitize physical records. The Inventory page grid will also display any records that have already been scanned.
For example, you need fast and easy access to a record. Instead of Access delivering the physical record, you can request a digital copy of the record and receive the record within hours. This also lets you to build your organization's inventory of digitized records.

-
To place an order for Access to scan and digitize the record, select the record.
-
On click the Actions menu to the right of the record and click Image. Or click the record icon (for example a folder) and then click the Image button on the record details page.
-
On the Image page, click Place Order. An Order ID and order status displays.
-
Click Done.
-
You can check your order status the Orders page.
If your Access Unify subscription includes the Orders feature, you can place an order for Access to scan and digitize physical records. The Inventory page grid will also display any records that have already been scanned.
For example, you need fast and easy access to a group of records. Instead of Access delivering the physical records, you can request digital copies of the records and receive the records within hours. This also lets you to build your organization's inventory of digitized records.
-
To place an order for Access to scan and digitize the records for a group of records (scan on demand), in the Inventory page the grid, or on the Search Results page, select the records.
-
Specify the column(s) to display record groups in the grid. You can also remove or add column(s) to display record groups and the grid will refresh. For example, to request Access digitize the records for a specific customer, you can group by Client Name, Matter Name, and Parent Container File Barcode. Then you can submit one request to digitize the records at the container level.
-
Select the group of records.
-
On the Batch Action menu on the bottom left click Image.
-
On the Image page, click Place Order. An Order ID and order status displays.
-
Click Done.
-
You can check your order status the Orders page.
You can add or change record information to make finding records easier. For example, you can update the Discharge Date for a medical record.
-
Click the Actions menu to the right of the record and click Edit Record.
-
Or click the record and on the records details panel, click Edit Record.
-
On the Edit Record page, enter the record information.
-
Click Save.
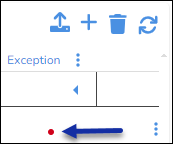
If there's a red dot in the Exception column, the record has no metadata information except for the Customer File Barcode.
-
Select the records with the Exception indicator.
-
Click Export Selected to generate an Excel report.
-
In the Excel report enter the missing information.
-
Provide the report to your contact person at Access so we can import the information into Access Unify.
-
To clear the Exception indicator for records, select records with the Exception indicator, and then click the
 Reset Exception button. The Exception column refreshes and the indicator no longer displays.
You can generate a .CSV file report of all the records in the Inventory page grid.
-
Click
 .
. -
Select Metadata All.
-
Select Do you want to continue with the export?
-
If the records include image attachments and you want the report to include the attachments' Document Name, Document Type, and other information, select Add Images Metadata.
-
Enter a tag name for your request. A tag makes your request easier to identify in your Download Inbox.
-
Click OK.
-
Check your email. A notification will display when the report is ready to download from your Download Inbox.
You can generate a .CSV file report of select records in the Inventory page grid.
-
Select the records in the grid.
-
Click
. -
Select Metadata Selected.
-
Select Do you want to continue with the export?
-
If the records include image attachments and you want the report to include the attachments' Document Name, Document Type, and other information, select Add Images Metadata.
-
Enter a tag name for your request. A tag makes your request easier to identify in your Download Inbox.
-
Click OK.
-
Check your email. A notification will display when the report is ready to download from your Download Inbox.
Access Unify provides several ways to add individual or multiple digital records to your inventory.
-
To add an individual digital record to your inventory, click the
 Add New Record button, in Item Details enter the record's metadata, and then click Save.
 -
To add multiple digital records with different metadata using a template, if this feature is enabled and you have the permission, click the
 Upload Records button. Click Upload Metadata Template.csv. Click Download to download a spreadsheet template based on the record type. Enter the record information into the .CSV file. Enter any dates in the template in MM/DD/YYYY format. And then click Upload .CSV.
 -
To add individual digital records, if this feature is enabled and you have the permission, click the
Upload Records button. Click Manually Enter. Enter the record information and then click Submit. -
You can also drag or browse for files to add as records to your inventory. Click the
Upload Records button. You can upload any file type except for .EXE or .DLL files. For example, you can upload CAD files as records. If you upload a .ZIP file, the maximum file size is 5 GB.Access Unify will schedule the records to be uploaded. And you can monitor the progress in your Inbox. Access Unify will also send you an email notification about the status of the upload.
After uploading records, if you try to view files in the Inventory grid that are not supported by the Document Viewer, Access Unify will prompt you to download an application to view the file or file will display in your browser.
You can upload attachments to your organization's physical records. For example, you can attach an addendum to a contract.
You can upload TIFF, TIF, PNG, PDF, JPEG, JPG, DOC, DOCX, PPT, PPTX, MSG, EML, BMP, and GIF files. The maximum file size per upload is 50 MB. And the maximum total file size per upload is 500 MB. And you can only upload six images at a time.
-
Click the Actions menu to the right of a record and select Upload. Or in Details, click Upload.
-
Click Browse Files and select the file(s) on your computer.
-
Click Open. A message displays: "Upload Successful."
-
On the Inventory page, you can search a column like Customer File Barcode. The Attachment column displays a paperclip.
-
In Details, double-click the record or click the Actions menu to the right of the record and select View.
-
Click the attachment to open in the Document Viewer.
-
You can also download attachments.
On the Inventory page, you can tag records. Tagging is like adding labels to records. Tagging makes it easier to categorize, find, share, and manage records. For example, you can tag records for an audit, or destruction.
-
Select the records in the grid.
-
Click the
 Assign Tag button.
 -
In the Assigning Tags page, select the tag(s) to apply to the record(s), and then click Add to Selected.
You can also apply tags to an individual record on the Edit Record page.
The Tags column in the Inventory page grid displays any tag(s) assigned to records. You can also filter the Tags column by tag(s). Tags also display on a record's details page.
Tagging administrators can create and delete record tags for your organization.
You can remove a tag from an individual record on the Edit Record page.
You can also remove a tag from multiple records. Select the records in the Inventory grid, click Batch Action, and then click Remove Tags.
You can remove records from the Access Unify inventory. For example, an administrator can delete records that were created in error. Or an admin can delete records with erroneous attachments.
Deleting does not create a destruction order for a physical record. And there is currently no feature to recover deleted records.
-
Select the records in the grid.
-
Click the
 Delete Record button.
 -
Select Delete Selected or Delete All records in the grid.
-
A page displays two options: Do you want to delete images from selected item(s)? and Delete items. Select the desired options. For example, if there is an image attached to the record, you can remove just the image PDF file and keep the record. Or you can delete both.
-
To confirm the deletion, type permanently delete in the text input field.
-
Click OK.